What caused Buckling and Cupping on flooring, and how to deal with it?
2023-01-11 16:56:34
2022-09-06 10:34:35
2022-09-06 10:30:49
2023-02-15 10:13:32
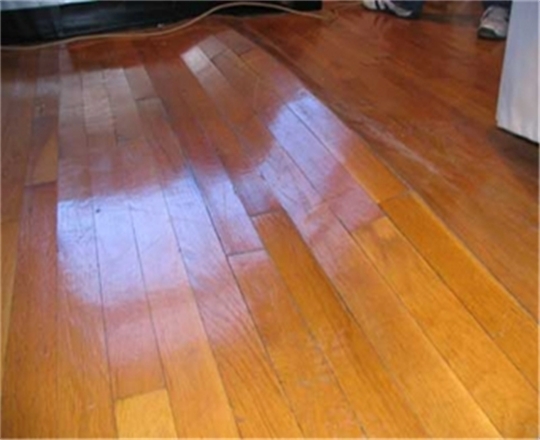
With hardwood flooring being the fastest growing segment in the flooring industry, problems also increase in number. One of these problems is the floor lifting from the sub-floor surface and is commonly called buckling. Usually problems with buckling or cupping in a wood floor are caused by excessive humidity inside or under your house. It's possible that a non-permeable house wrap was used behind your new siding, which is increasing the humidity level in your home; or that the siding covered up existing foundation vents under your home. In either case, you should monitor the humidity level inside and under your home using a humidity gauge (hygrometer) to make sure both areas are under 60% relative humidity. Solid wood flooring moves constantly as the humidity level changes – expanding when the humidity is high and contracting when the humidity is low. This problem is particularly pronounced during a hot, humid summer or cold, dry winter.
What's the Buckling?
Buckling is defined as lifting off the sub-floor surface and can be found on concrete sub floors and wood sub-floors. All flooring can buckle even carpet and stone floors, given the needed conditions to expand in size. Wood, by its nature, swells with the increase of moisture content and shrinks with the loss of moisture content.
Buckling is the result of wood floors swelling and having no place to go but up and off the sub-floor. The condition needed to result in buckling is the addition of moisture or water to the flooring. Flooding is the obvious, with increase in moisture the most difficult to detect.
Flooding from broken pipes, appliances or water overflowing the bathtub or sinks are common sources of water flooding hardwood flooring. These conditions are easily detected because they are visible and easily seen. Flooded floors may not buckle if the water is removed soon after the event and dried using fans and de-humidifiers. But allowing water to remain in the wood flooring will most likely result in the floor swelling and buckling.
The addition of moisture, from environmental vapor, is difficult to identify and may require a certified professional or inspector to determine. This condition stems from installing dry wood in a damp environment or the environment changing after the installation.
In southern states we see this condition after hurricanes and the resulting power failures. The interior of the home increases in relative humidity and wood moisture content causing the boards to swell and lift off the sub-floor. The buckling condition allows movement of the flooring boards causing a squeak sound and sometimes a squeak noise caused by two boards rubbing together.
Buckling may not be a repairable condition and may require removal and re-installation.
Reasons for Flooring Buckling or Cupping
· If the humidity level inside or under the house is much higher than the wood flooring was acclimatized to when it was installed, it can cause the boards to expand and buckle.
· If the humidity level inside or under the house is much lower than the wood flooring was acclimatized to when it was installed, the flooring may shrink and leave gaps between the boards.
· If the humidity level is much higher or lower inside your house compared to under it, it can lead to the boards cupping.
· If the flooring cups down (the center of the width of each floor board on top is higher than the edges), the humidity inside your house is substantially higher than the humidity in the crawlspace or basement under it.
· If the flooring cups up (in a "U" shape on top), the humidity in the crawlspace or basement is much higher than that inside your house.
How to Reduce Humidity Inside a House
· Run a properly sized air conditioner during hot, humid weather.
· Use bathroom vent fans (vented to the outside) during and for 10-15 minutes after showering or bathing.
· Run a kitchen stove vent fan (vented to the outside) when cooking.
· Make sure the clothes dryer vent is unobstructed and vents outside your house.
· Consider installing a dehumidifier if the above suggestions are not enough to lower the humidity level under 60%.
How to Reduce Humidity Under a House
· Make sure there isn't any standing water in the crawlspace or basement under your house caused by plumbing leaks or drainage problems.
· Be sure the ground slopes away from your house, and rainwater is diverted away from the foundation.
· Seal the walls and floor of your basement with a waterproof sealer, or cover the ground in the crawlspace with thick (6-mil or more) plastic sheeting.
· Make sure there is adequate ventilation in the crawlspace under your house (1 square-foot of vent space per 150 square feet of crawlspace).
· If problems with high humidity in the crawlspace or basement under your house persist, consider closing up all vents and installing a dehumidifier under the house or conditioning the space under the house.
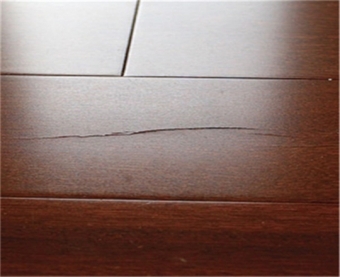
Main Reasons And Solve Measures For Creak/ Split/ Break/ Fissure Problems On The Flooring.
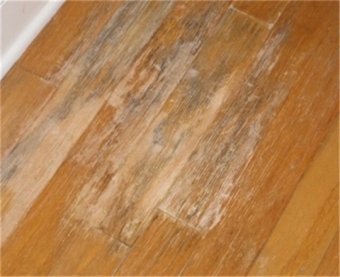
How to prevent, control, or repair mold/mildew floor?
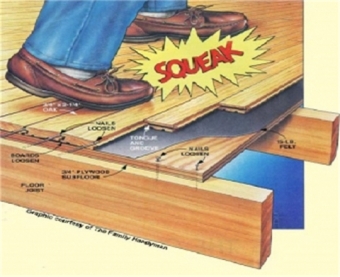
How to deal with LOOSE, NOISY, and SQUEAKY FLOOR?
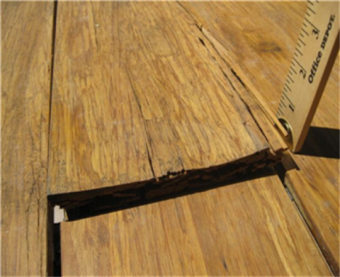
Exposed to moisture for an extended period of time, bamboo flooring products can absorb moisture and weaken. Because bamboo is grass, the grain runs the length of the board. Inferior or inappropriate bamboo selection, the use of bamboo that is either harvested too young or not properly dried can be prone to changes in temperature and humidity. This can lead to cupping, warping and swelling of the material. Reason 1. Uneven distribution of floor moisture content 2. The floor is slotted on one side and not slotted on the other. The two sides of the floor are not the same as the air contact area, and the degree of water absorption is different, resulting in different moisture content on both sides of the floor. In the case of high air humidity, there is less water in the air without the slotting side, and the side of the back slot absorbs more water in the air, expanding the face surface of the back slot, but the surface of the plane does not expand, so the floor will bend like that of the plane. In the case of air drying, on the contrary, the board will bend like a slotted side. ▶▶ Solutions 1. In production: When health balance, drying should not be too fast, drying kiln to keep the temperature uniform; Try to make sure that both sides of the floor have the same texture 2. How to avoid before installation Proper expansion joints reserved for paving 3. After installation Because the weather humidity changes with the season, you can see if the floor will recover in a few months. If it is still tile, you can only replace the floor

We all know that the raw materials of SPC flooring are mainly composed of plastic and stone powder, the content of stone powder is too small, the RIGID SPC FLOORING is not strong and the cost will rise, and too much stone powder will also cause the floor to be brittle and easy to break
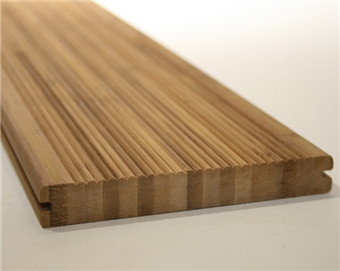
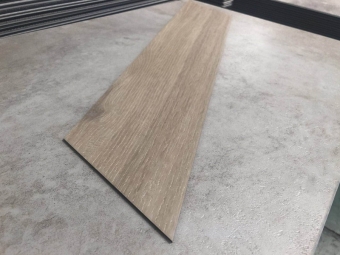
Solid Bamboo Decking, Vertical Size: length:1960-6000mm; Width:90-200mm; Thickness: 18mm

29.1 Principle Increasing loads are applied in specified steps to a diamond scratching point of defined geometry The resistance to scratching of the decorative laminate sheet under test is expressed as a numerical rating which defines the maximum applied load which does not produce a continuous surface scratch. The test result is verified by visually confirming that the next higher load-step produces a continuous scratch. 29.2 Materials 29.2.1 Contrast medium, e.g, graphite, talcum, or solution of dye in alcohol, to contrast with the colous of the sheet under test. 29.2.2 Supply of cotton fabric 29.3 Apparatus 29.3.1 Scratch testing apparatus, (see Figure 18), consisting of the following parts: 29.3.1.1 Stand, with a device to indicate the horizontal, for example a spirit level 29.3.1.2 Motor driven turntable, able to rotate about a vertical axis without play. The rotational frequency shall be (5 +/- 1) revolutions per minute. 29.3.1.3 Arm, carrying the holder for the diamond, mounted on a ball bearing, with a horizontal axis The height of this axis shall be adjustable so that the arm is exactly horizontal when the scratching point rests on the test specimen 29.3.1.4 Means of applying a known load, with an accuracy of +/- 0.1 N to the scratching point. 29.3.1.5 Hemispherical diamond scratching point, with a point radius of (0,090 ± 0,003) mm and an included angle of (90 ± 1) degree (see Figure 19). (The diamond shall be mounted in the holder with the flat part on the leading side of the shank facing the working direction.) NOTE 1 The crystal axis of the diamond shall be parallel to the longitudinalaisof the diamond holder. The dimensions of the diamond holder are approximate and are for information only. NOTE 2 Diamond Points conforming with these dimensions and profile are available from: Cie Weinz, Industrie Edelstein Fabrik, Postfach 2740, D-55743 Idar-Oberstein, Germany: and through Erichsen GmbH and Co. KG, D-58675 Hemer-Sundwig/Westfallen, Germany NOTE 3 This is an example of a suitable product that is available commercially. This information is given for the convenience of users of this part of ISO 4586 and does not constitute and endorsement by ISO of this product. 29.3.1.6 Clamping disc, to keep the test specimen flat 29.3.2 Viewing enclosure, having a matt black interior and a light source (defined below) located at the top. Its dimensions shall be such that the test specimen is located vertically below the light source and at a distance of 600 mm. An aperture in the front shall allow inspection of the test specimen at various angles from a distance of (400 ± 10) mm. A diagram of a suitable enclosure is shown in Figure 20. The light source consists of a 100 Watt frosted bulb, mounted in a white reflector having ar aperture of approximately 140 mm diameter and producing an illumination of 800 lx to 1000 lx at the specimen surface. 29.3.3 Conditioning chamber, in accordance with ISO 291, with a standard atmosphere of (23±2) ℃ and relative humidity (50 ± 5) %. 29.4 Calibration of apparatus Place the diamond point on the table of the electronic balance (see 29.3.4) and, with arm in a horizontal position, verify that the position marks for sliding weight correspond to the load values shown in Table 4. If not, move weight as necessary to achieve the correct loads, and mark the correct positions on arm. Table 4 ---- Load values Position mark 1,0 N 2,0 N 4,0 N 6,0 N Load (grams force) 102 +/- 1 204 +/- 1 408 +/- 1 612 +/- 1 Standardization of the apparatus shall be carried out at least once a year. 29.5 Test specimen The test specimen shall be a square of side (100 ± 1) mm cut from the sheet under test. One specimen shall he tested. Wipe the specimen sur face using cotton fabric (sse using cotton fabric (see 29.2.2) impregnated witl ed in the test area. Before making the scratch test, store the specimen for 72 h in the standard atmosphere specified in 29.3.3 29.6 Procedure Make sure that the stand of the test apparatus is standing horizontally. Adjust the height of the arm so that it is horizontal when the diamond point rests on the test specimen. Start the test by making two scratches at 1,0 N load with a spacing of 1 mm to 2 mm between the scratch marks. On the same specimen repeat this procedure with loads of 2,0 N, 4,0 N, and 6,0 N, leaving a space of mm to 5 mm between each pair of scratches. Remove the specimen from the apparatus and rub the entire scratched area of the surface with a suitable contrast medium (see 29.2.1) so that it is engraind in any scratches. Carefully wipe the surface with clean cotton fabric (see 29.2.2) to remove any excess contrast medium which is not engrained in a scratch. This procedure is necessary to ensure that only true scratches are considered, and superficial hairline polish marks are ignored Place the specimen against the centre support in the viewing enclosure (see 29.3.2) in a position so that the specimen can be viewed at right ...
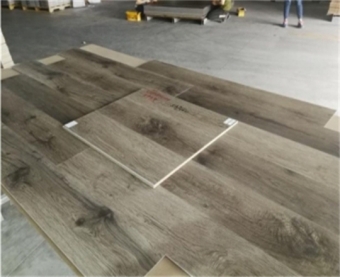
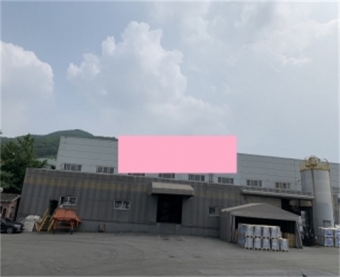
Vinyl flooring inspect in the Korea.


 ONLINE
 +86(551)82322038
 cfinspection@aliyun.com